NOTICE
The lore articles on the wiki are currently being rewritten in some capacity. If you wish for the most updated information, or knowledge on a specific article, the best place to reach out is in #sim-lore-general on Discord.
New Player Guide: Difference between revisions
m (minor updates) |
m (discord link added) |
||
| Line 11: | Line 11: | ||
If you've played second life before, have an account and would like to get started in the sim or if you've read the above and are comfortable enough to dive in, you're first stop is [http://maps.secondlife.com/secondlife/Caymen%20Shores/160/177/2126 visiting the sim.] | If you've played second life before, have an account and would like to get started in the sim or if you've read the above and are comfortable enough to dive in, you're first stop is [http://maps.secondlife.com/secondlife/Caymen%20Shores/160/177/2126 visiting the sim.] | ||
Once you've teleported to the above link, you should be in our landing area, a safe OOC hub where you can get acclimated to the sim. In front of you will be a set of terminals past the lounge chairs. Ensure you check the [[Sim Rules]] before progressing. There is also a link to our | Once you've teleported to the above link, you should be in our landing area, a safe OOC hub where you can get acclimated to the sim. In front of you will be a set of terminals past the lounge chairs. Ensure you check the [[Sim Rules]] before progressing. There is also a link to our [https://discord.gg/cKaxDZ9 Community Discord], the best place to go if you have questions or need help. | ||
[[File:Starter_area.png|thumb|center|Starter Terminals|500px]] | [[File:Starter_area.png|thumb|center|Starter Terminals|500px]] | ||
Revision as of 06:26, 20 May 2020
!! PAGE EXPANDING SOON!!
This should include the following, downloading and creating an SL account, links to the rules and lore overview and a guide to creating a avatar that's ready for use in the sim.
New to Second Life
If you're brand new to second life, check out the page on Getting Started with Second Life.
We suggest getting used to the controls and interface before visiting the sim as they can often be confusing to newer players.
Visiting the sim
If you've played second life before, have an account and would like to get started in the sim or if you've read the above and are comfortable enough to dive in, you're first stop is visiting the sim.
Once you've teleported to the above link, you should be in our landing area, a safe OOC hub where you can get acclimated to the sim. In front of you will be a set of terminals past the lounge chairs. Ensure you check the Sim Rules before progressing. There is also a link to our Community Discord, the best place to go if you have questions or need help.
Getting the HUD and registration
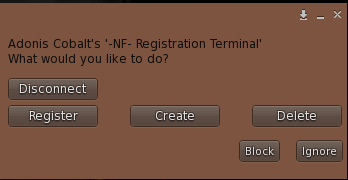
To get the HUD for playing in the sim, first click on the sim group terminal, which will give you a link to the main group for the sim, which is required to register. Join the sim group and activate it from your groups. Next you can click the Registration terminal.
You should see the above menu, from here click Register and the system will register you. Click the hud box next to the registration terminal, then accept the folder it will give you. Check your inventory and you should have a new folder named -New Frontiers- with two items inside, right click and Add both of these. If there is an update, the server will send you the most recent hud, which you should use instead. Now you're ready to begin creating a character!
Creating a character
Before moving onto the character creation terminal you should get a good idea of what character you intend to create. Which of the Races available within the sim will they be? Make sure you pick one that is in line with their races appearance guidelines which can be found on each races page along with the general Appearance Guide for all races and avatars.
Once you've decided on a race, you should think about their background, pick out where they came from, what they've done and why they're here. A good place to start for a general idea of the sims lore is the Lore Overview page along with the race you intend to play's page.
Once you've done so, you can click on the terminal again and select Create. You'll be asked to provide a name and select a race and racial. Do not use special characters when creating a character, just alpha numeric and spaces. You will be asked to pick a racial ability however these are no longer used and have no effect so choose whichever you'd like.
Once you've created your character, there is a teleporter pictured below that will bring you down to the IC area below when you are ready to start.
Items and Inventory
The players inventory is filled by both collecting looting nodes scattered around the sim, as well as obtaining your UBI from the sims ATM system.
In the interim, when you first step on the IC landing platform, there is a box in front of you to grab a basic, starter kit for combat RP.
Getting an ID
You begin your character with an ID in your inventory
Story
We Recommend returning to the main page to begin reading through the array of race and political lore that has been created for the sim. If you want somewhere to start, try finding which race you've chose, or which interests you, and begin reading up on their information.
Dice Combat
To start, dice combat follows the guidelines set out in the public Dice document
The stats involved in combat require the necessary items connected to them, such as, only being able to use an assault rifle if you HAVE an assault rifle.
To begin, you actually have to become engaged in combat through roleplay. This can be the result of an argument, attempted offense, or just sparring. If the combat does not use a surprise attack, all parties agree to combat, and they roll initiative.
After initiative is selected, each player takes a turn pointing out their intended actions, performing the rolls or checks therein, and then posting the roleplay of said action, while the next part is planning their move. Combat is intended to be resolved quickly, but expect some days, it may take and hour or two for a full combat scene to play out.


