NOTICE
The lore articles on the wiki are currently being rewritten in some capacity. If you wish for the most updated information, or knowledge on a specific article, the best place to reach out is in #sim-lore-general on Discord.
HUD Basics: Difference between revisions
m (Added instructions on what to do when they make a mistake during character creation.) |
m (→Titler: added @combat command) |
||
| Line 122: | Line 122: | ||
@AFK | Go Away From Keyboard | @AFK | Go Away From Keyboard | ||
@combat | Set your character's combat preference (i.e. Non-Combat, Neutral, Combative, Hostile) | |||
Latest revision as of 15:50, 8 June 2023

|
Wiki Update in Progress
This page is currently undergoing major updates. Thank you for your understanding! |
| Quick Navigation | ||
|---|---|---|
| Welcome! | HUD Basics · Character Creation · Crafting and Looting System · Combat Guide | |
| External Links | Item List · Dice Combat Manual · HUD Control Panel | |
Initial HUD Setup
Welcome to New Frontiers!
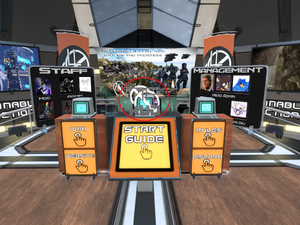
- In order to begin playing, you will need to get the sim's hud from the dispenser located on the center desk of the Main OOC Hub. (Seen here circled in red!) Clicking this item will provide you with a folder with includes the HUD and Titler system for New Frontiers. Attach both!
- The HUD will attach on the left of your screen, and you'll get a chat message with a registration link for you to click, where you will setup your account. Do not use the same password you use for SecondLife.
- You will be taken to the login page afterwards. Please login with your SL username and the password you just created.
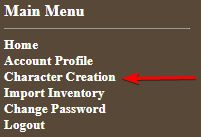
Username Resident or Firstname Lastname, using a space instead of a.to login. - Once you have logged into the control panel, you should select the "Character Creation" option on the upper left side of the screen to create your first character. Before preceding, check out our Character Creation page for relevant race and trait information!
REGISTERING YOUR HUD
This is a process all players need to follow before roleplaying in the sim. This is necessary in order to track your character inventories, and alt characters. In order to register with the HUD system you must do the following.
- Get the newest edition of the HUD from the OOC Hub.
- Unpack HUD from the box.
- Wear the HUD
- You will get a message such as the following.
- (Info): Your account has been created. Please go to…
- Click on the link provided
- Read the Terms of Service
- Set your password for the HUD system. The password is encrypted, but we recommend using a unique password that is not shared between websites.
- Log into the HUD control panel with that password, using your Second Life Legacy name
- Use a space instead of a period, as in <User resident>
You will see this menu on the site
Hud Basics
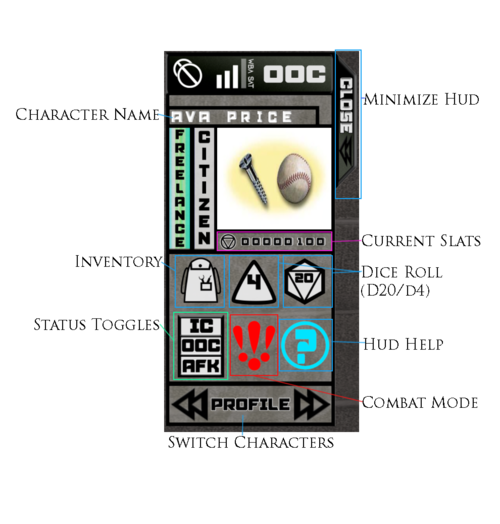
Below is a simplified diagram explaining what the various buttons do on the New Frontier HUD.
The HUD is divided into two sections, the Character Information Section, and the Dice System buttons. The Character information section takes up the top portion of the HUD display.
Your current Active Character's name, designation (Freelance Citizen), optional portrait (which can be uploaded via the HUD website, and current SLAT amount on hand (Slats are one of the in game currency options) all make up the Character Info Section.
The second Dice System Section Here you will find a majority of the hud buttons.
The buttons are as follows: backpack, which, when clicked will display your character's current inventory in the local chat, Dice buttons (for rolling various types of dice), Status Toggles between In Character (IC), Out of Character (OOC), and Away from Keyboard (AFK), Combat Mode button, which will switch your hud into combat mode and bring up a separate hud screen with combat specific buttons, and the help button, which provides links to various HUD help documents.
The very bottom of the hud features a button to switch Character Profiles for easy toggling through your character list.
HUD Commands
@channel | Sets hud channel
@rpchannel | Sets rp emote channel
@reset | Resets hud
@reload | Reloads titler data from server
@passreset | Sets a temp key so you can reset your password.
Characters
@char | Lists your characters
@char active | Lists active character
@char active <char> | Sets character active
@inventory OR @i | Lists full inventory
@equipment or @e | Lists equiped items.
@charpic UUID | Set your profile picture
@char+ | Change to next char
@char- | Change to last char
@color VECTOR | Sets hud color | <1.000,1.000,1.000> = white
@permits | Lists permits/licences
@limit | List energy points.
@credits | Show credits
RP Emotes | ! shout, ~ whisper, # /me, /me /me
Titler
@altname NAME | Sets alias name to titler and rp emotes
@hp AMOUNT | Set HP, hp over 0 switchs titler to combat mode
@title DATA | Set text before name in hud
@sex DATA | Sets sex in hud
@pos DATA | + traits
@neg DATA | - traits
@info DATA | Last line of titler
@wound | Set wound timer
@criticalwound | Sets critical wound timer
@removebuff BUFFNAME | Removes buff
@timers | Shows buff and debuff timers
@roll 1d20 + 1 : (Rolls to spot check) | Rolls 1d20 with + 1. Can se and dice number
@attack 1 + 1 : (Rolls to attack) | Rolls 1 3d6, sums and adds modifier.
@IC | Go in-character
@OOC | Go out of character
@AFK | Go Away From Keyboard
@combat | Set your character's combat preference (i.e. Non-Combat, Neutral, Combative, Hostile)
Inventory
@give AMOUNT ITEM NAME | Trade item to person from inventory
@transfer AMOUNT NAME | Transfer Slats from ban to bank
@equip ITEM | Equips one of specified item
@unequip ITEM | Unequip one of specified item
@deposit AMOUNT ITEM | Deposits item into container you're close to
@depositall | Deposits all non equip/implanted items into container you're close to
@withdraw AMOUNT ITEM | Withdraws item into container you're close to
@show AMOUNT ITEM | Show item publicly
@showall | Show all inventory publicly
@showallequip | Shows all equipped items publicly
@drop AMOUNT ITEM | Drop item
@use AMOUNT ITEM | Use item
@masswithdraw AMOUNT,ITEM | Withdraw more then one item
@massgive AMOUNT,ITEM NAME | Trade more then one item
Inventory Management
@quickd | List inventory in deposit format
@fav/unfav ITEM | Favs a item to not be depisited into contaners via @depotall
@showstats | Shows printout of what gives stats.


